WHMCS Plugin
How to install and configure iPaymu Direct Payment for WHMCS.
Introduction
What is WHMCS?
WHMCS (Web Host Manager Complete Solution) is a hosting business automation platform widely used by:
- Hosting Providers
- Domain Registrars
- Web Agencies
- IT Professionals
- Developers
Key Features of WHMCS
- Billing Management
- Payment Management
- Order Management
- Customer Support
- Reporting
- Domain Registration
- Hosting Provisioning
- Fraud Protection
- Customer Account Management
Beyond hosting, WHMCS can also be used for other products such as VPS, VPN, Email Hosting, Game Server, Domain Service, and other digital products.
Requirements
Pre-Installation Requirements
Before getting started, make sure:
- WHMCS is installed
- You have an iPaymu account
- You have your API Key and VA Number
- You have FTP or SSH access to your server
Step 1: Download the Plugin
Download the WHMCS plugin from the iPaymu Plugin page.
Step 2: Manual Installation
File Structure
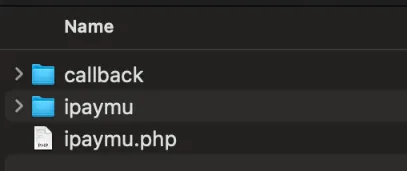
After extracting the plugin, you will find the following files and folders:
callback/
ipaymu/
ipaymu.php
Installation Steps
- Copy the entire contents of the
callback/folder to:
/modules/gateways/callback/- Copy the following files and folders:
ipaymu/
ipaymu.php
to:
/modules/gateways/Step 3: Activate the Module in WHMCS
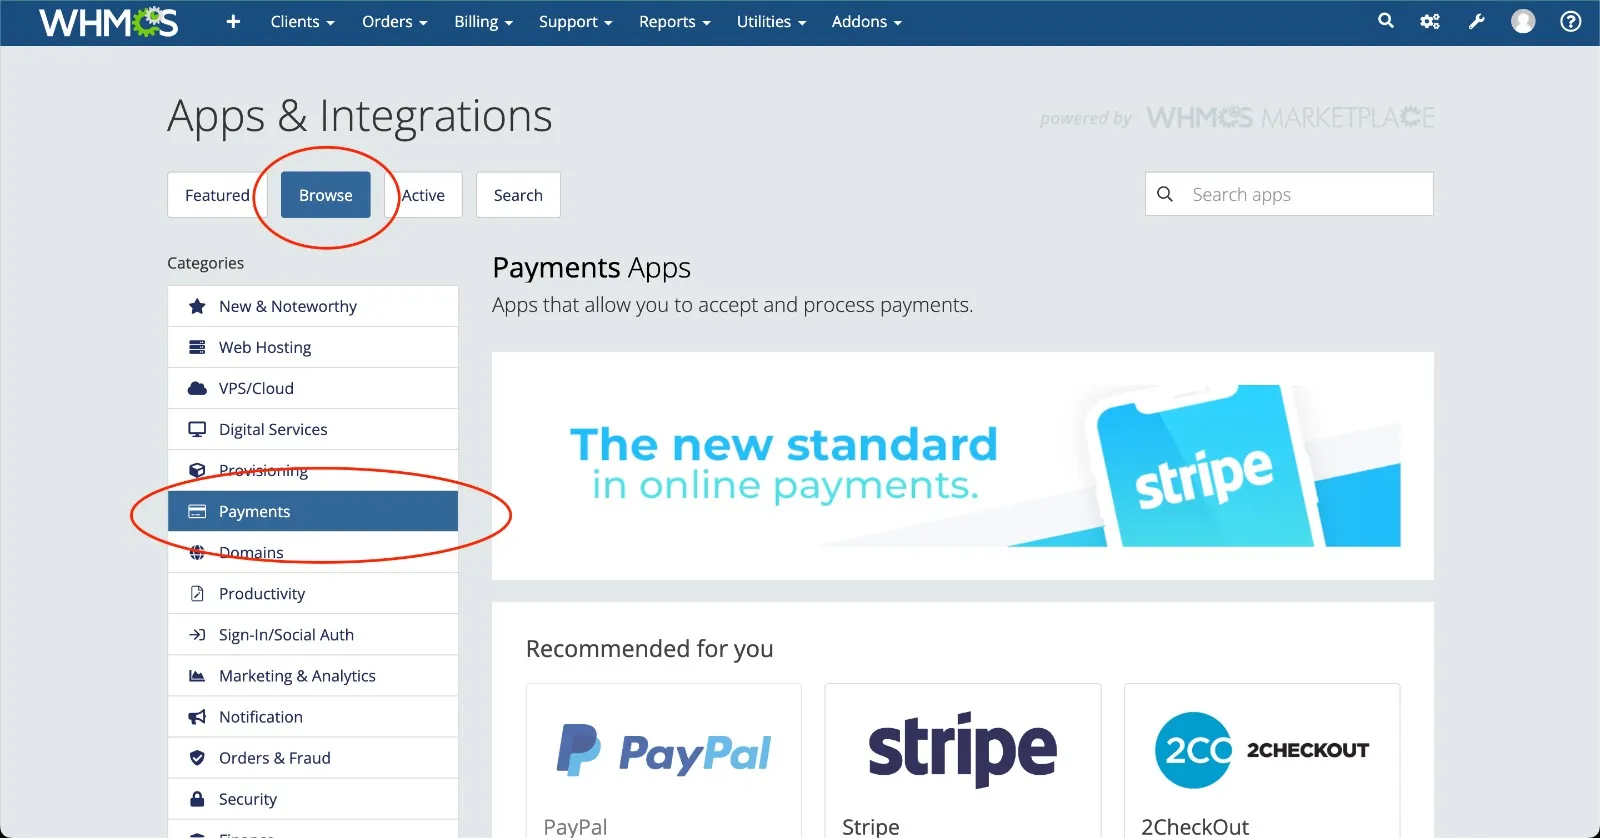
- Go to Settings → Apps & Integrations.

- Select Browse → Payments.
- Find iPaymu Direct Payment, then click Activate.
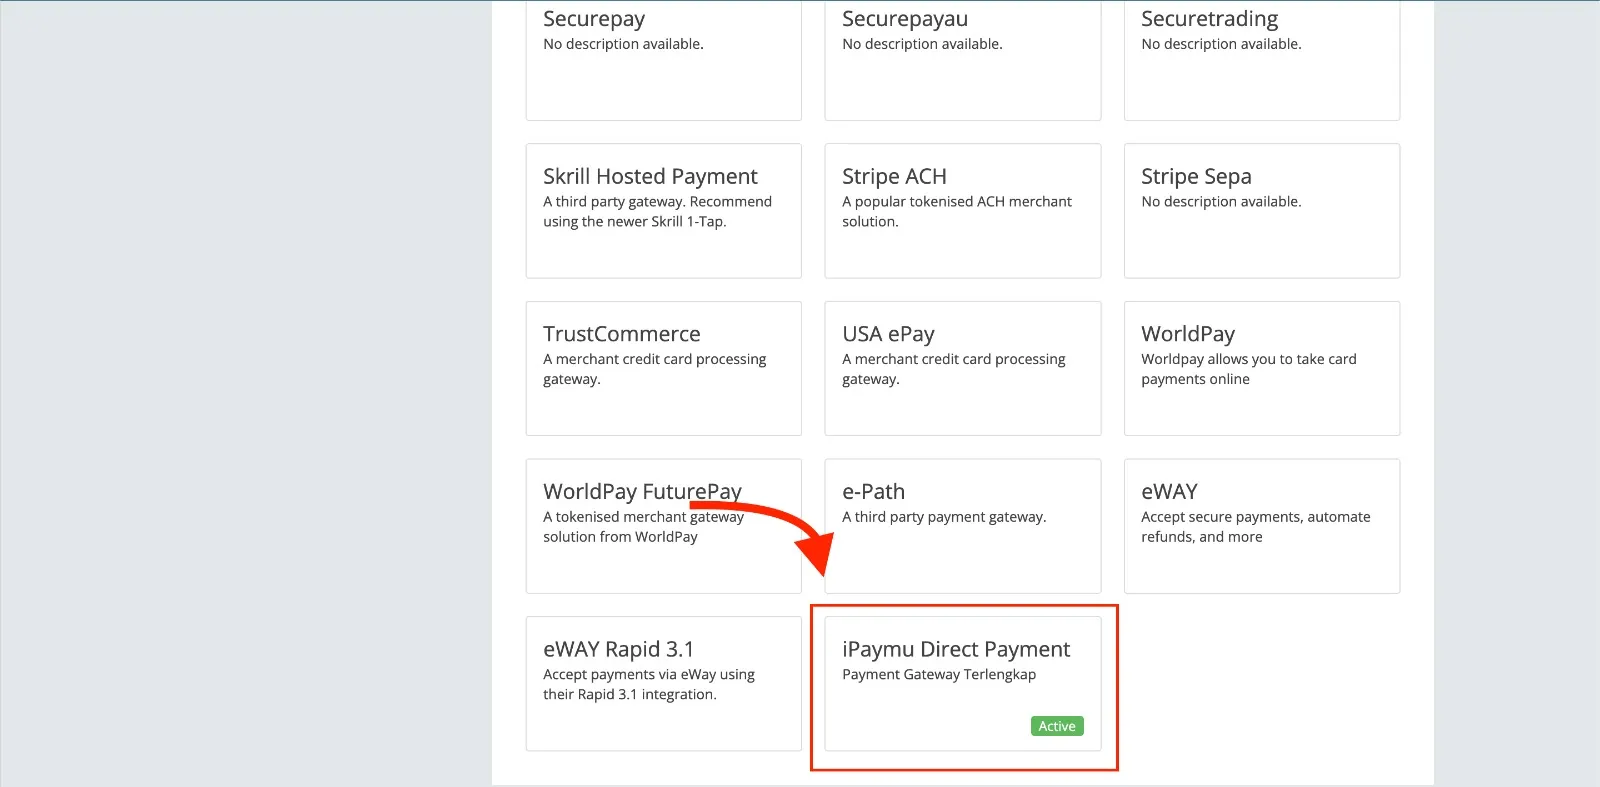
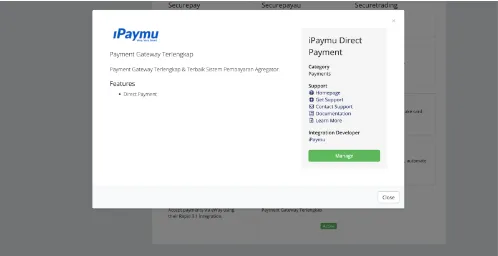
- Once activated, the Active status will appear. Click Manage.
Step 4: Configure iPaymu
- Enter the following configuration:
| Field | Value |
|---|---|
| Environment | Sandbox or Production |
| VA Number | Your iPaymu account VA Number |
| API Key | Your iPaymu account API Key |
- Click Save Changes.
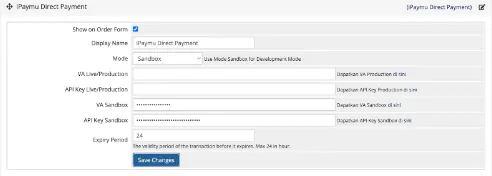
Sandbox Mode
Use Sandbox mode for testing before switching to Production mode.
Step 5: Configure Products
- Set up the Product Name, Description, and Product Display.
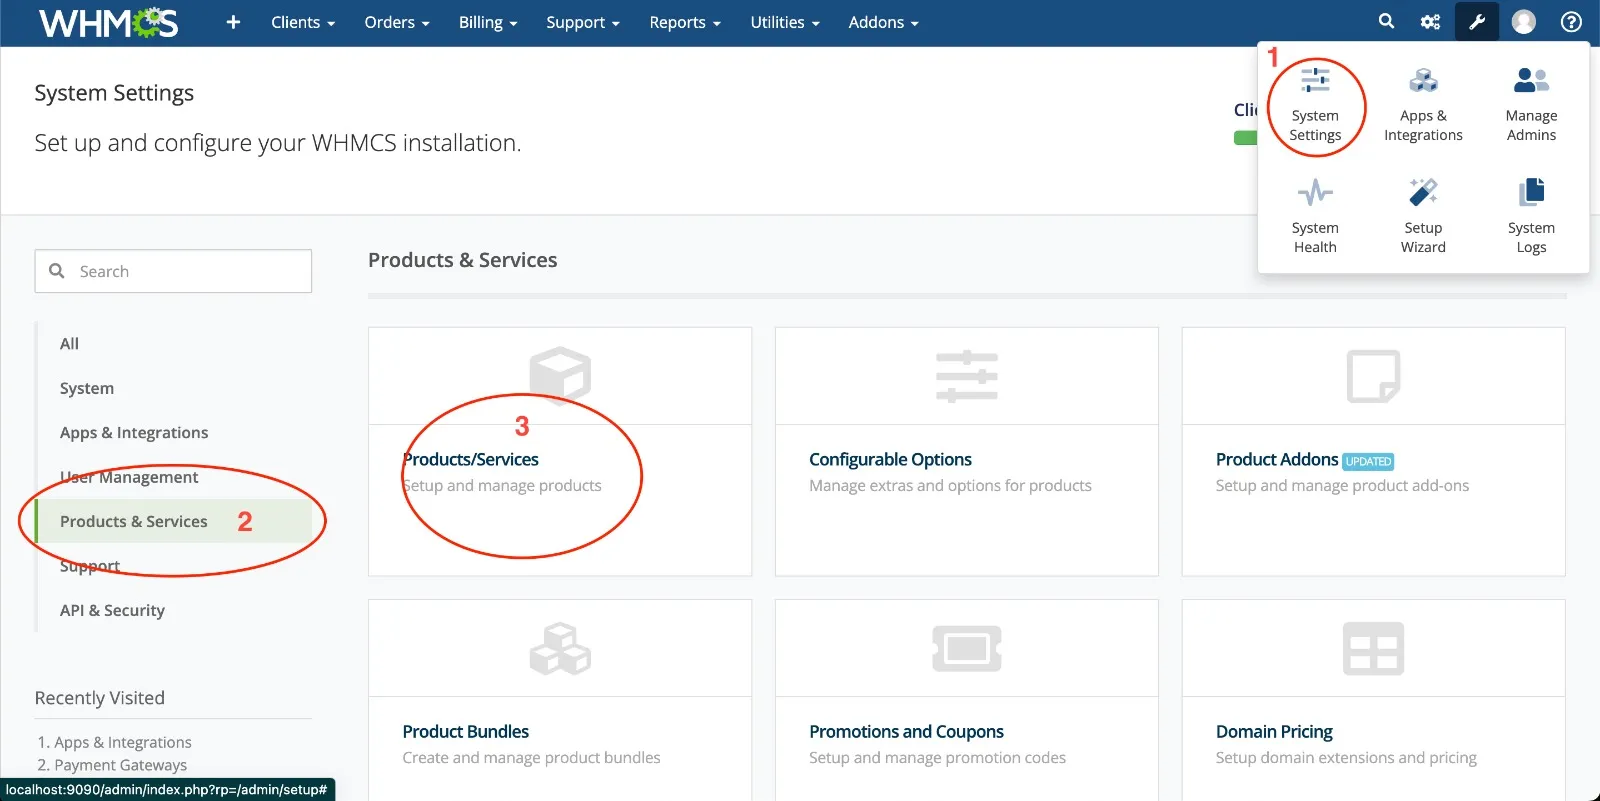
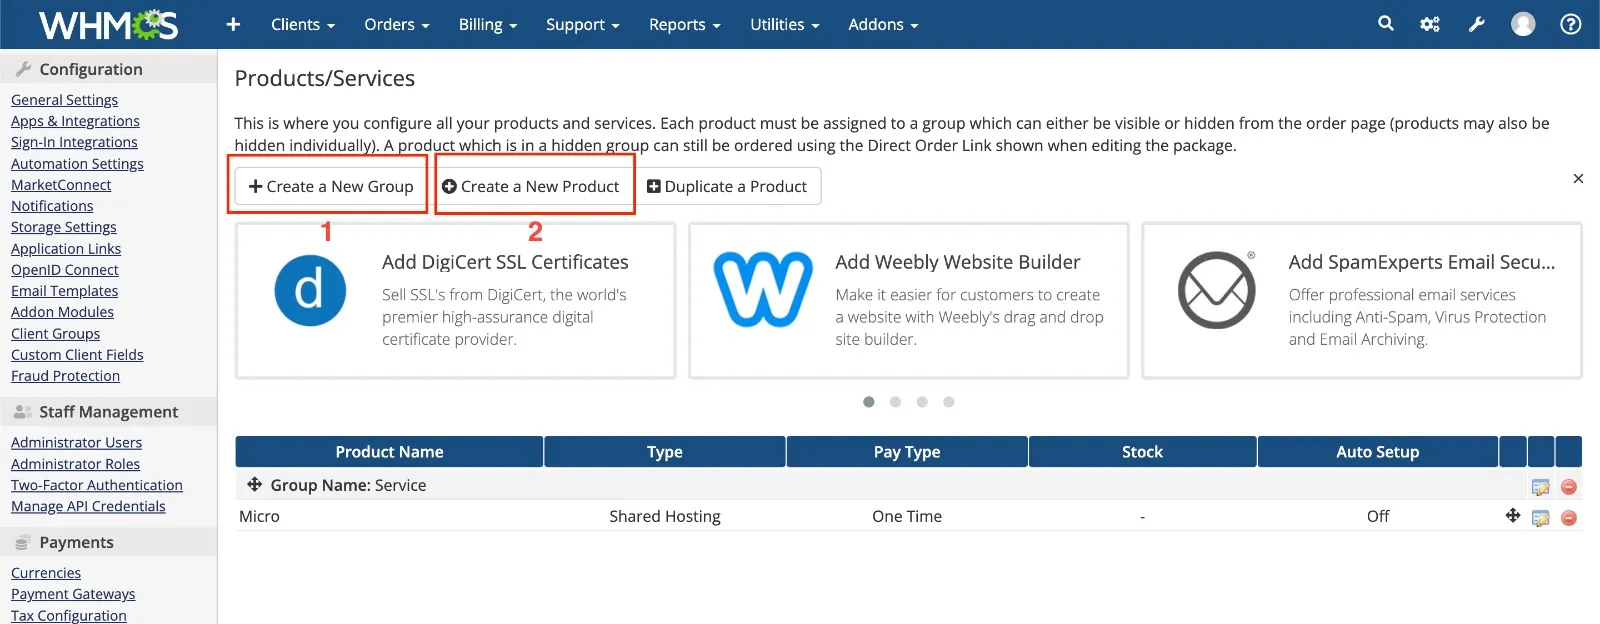
- Create a Product Group, then add a Product.
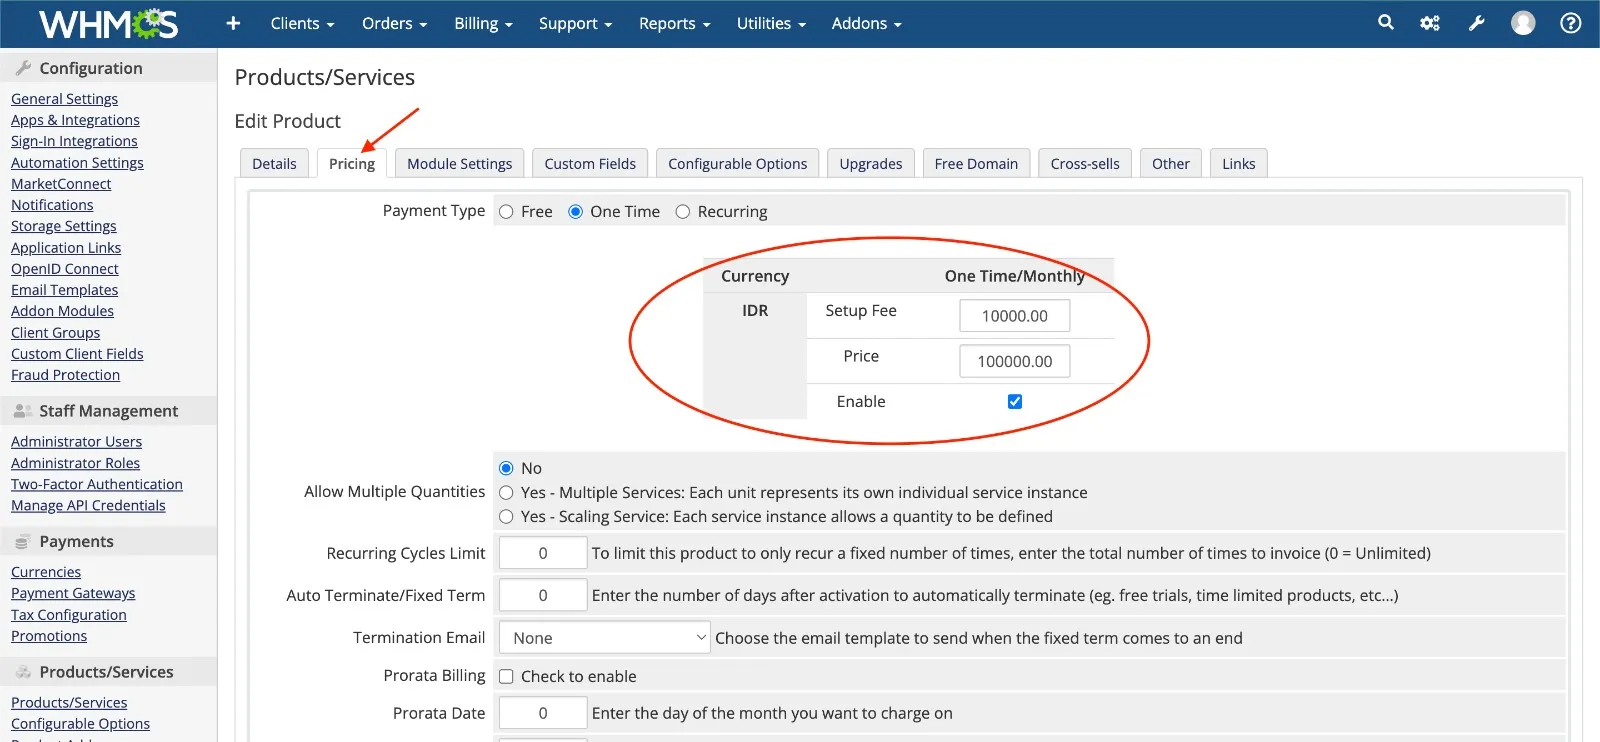
- Configure Product Pricing as needed, for example:
- Monthly
- Quarterly
- Semi Annually
- Annually
Step 6: Purchase Simulation
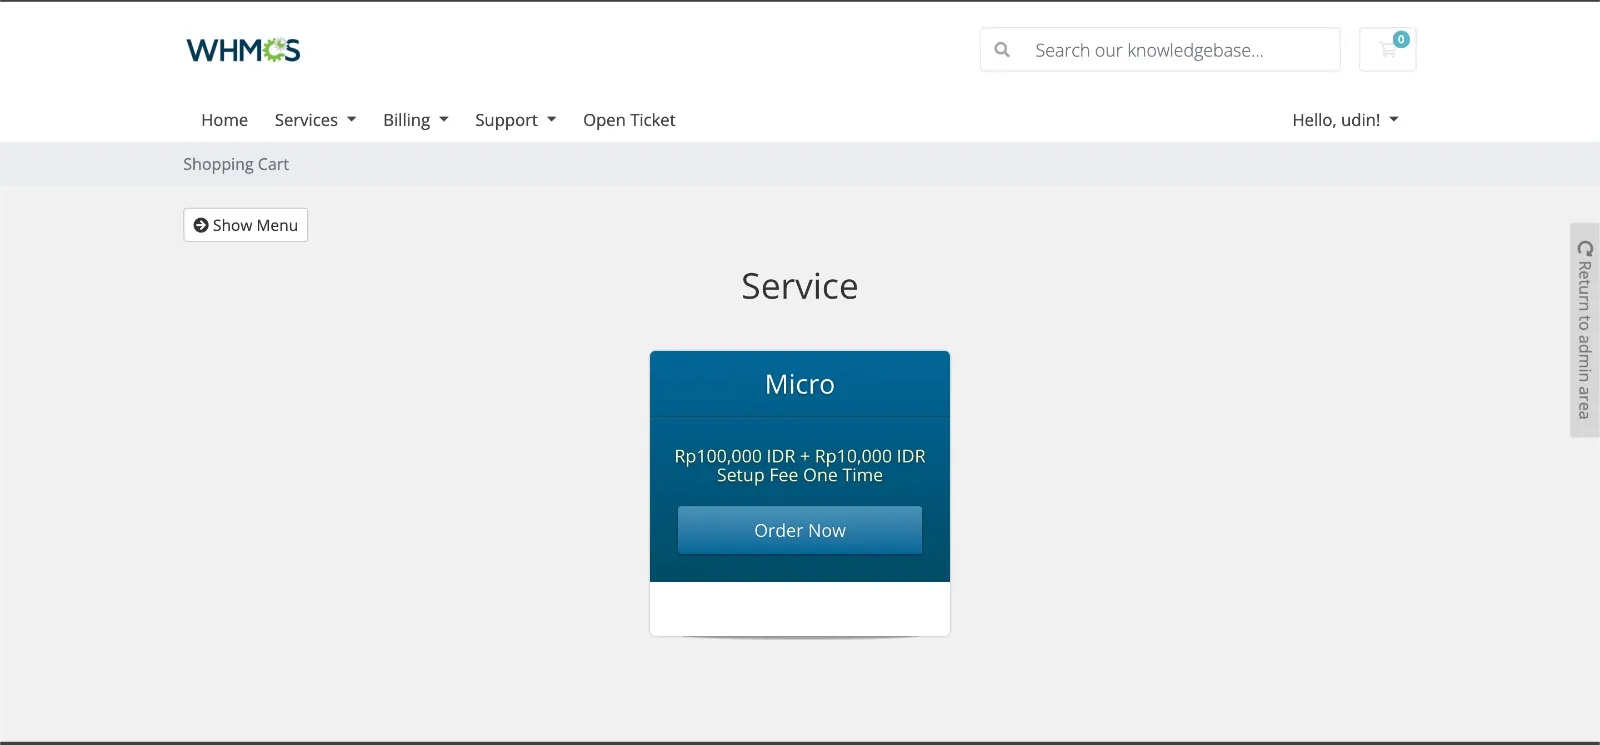
- The customer selects a product, then clicks Order Now.
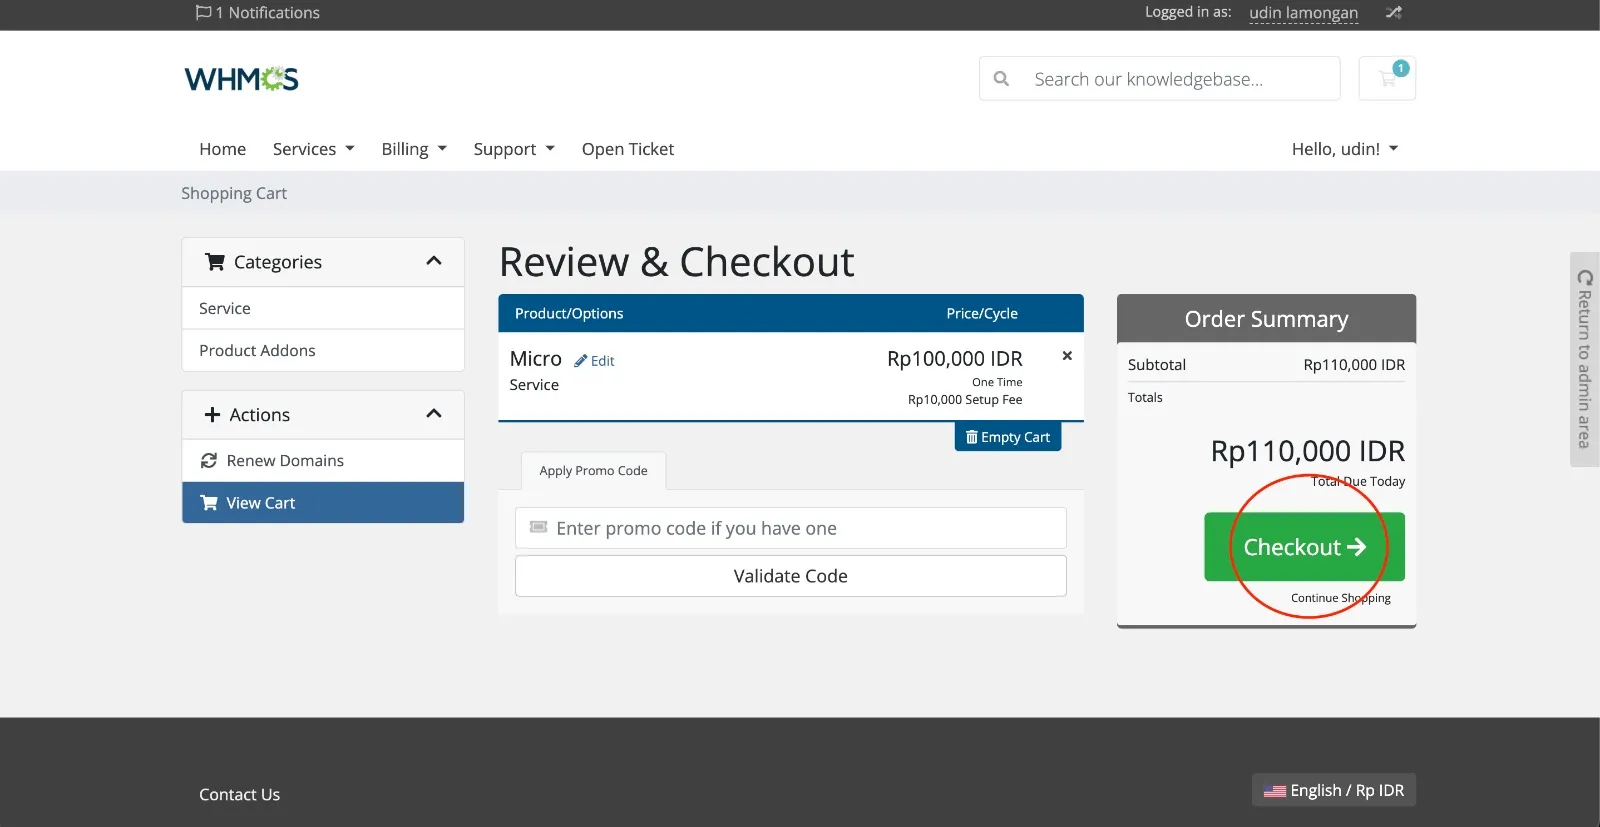
- The customer proceeds to Checkout.
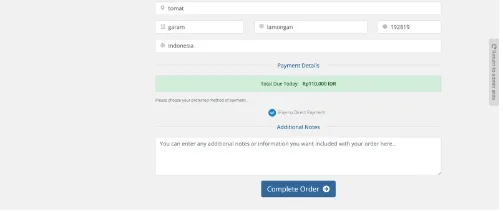
- Under Payment Details, select iPaymu Direct Payment, then click Complete Order.
Step 7: Invoice Payment
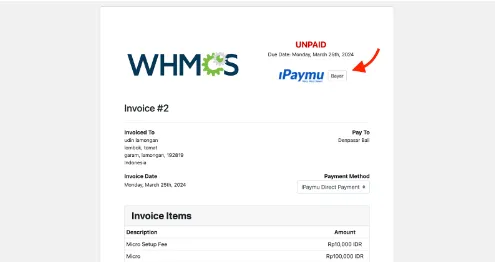
- The invoice is created and the Pay button appears.
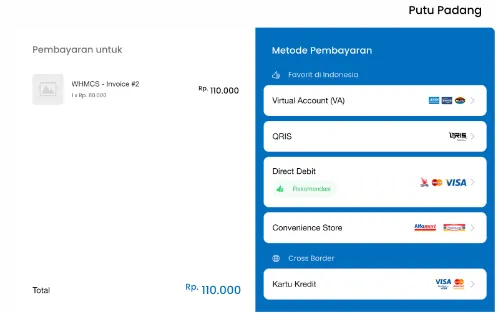
- The customer is redirected to the iPaymu payment page.
Step 8: Payment Status
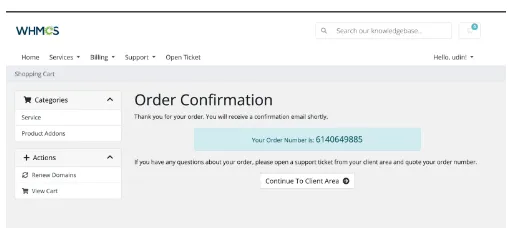
- After successful payment, the invoice shows a success status.
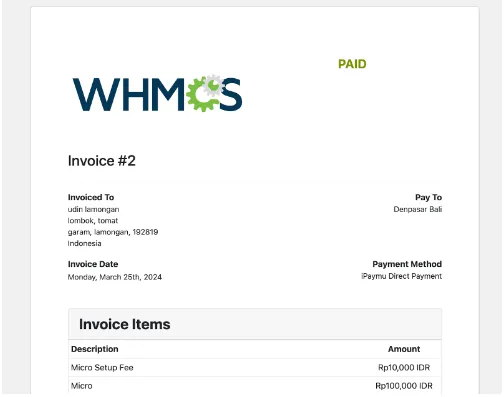
- The invoice status changes to PAID.
Error Handling
If the invoice amount does not meet the requirements or there is a configuration error, the system will display an error message.
Troubleshooting Tips
- Make sure your API Key and VA Number are correct.
- Ensure the Environment is set correctly (Sandbox for testing, Production for live).
- Verify that the callback URL is accessible from the iPaymu server.
Integration Flow
%3B%7D%23my-svg%20.edgeLabel%20rect%7Bopacity%3A0.5%3Bbackground-color%3Argba(232%2C232%2C232%2C%200.8)%3Bfill%3Argba(232%2C232%2C232%2C%200.8)%3B%7D%23my-svg%20.labelBkg%7Bbackground-color%3Argba(232%2C%20232%2C%20232%2C%200.5)%3B%7D%23my-svg%20.cluster%20rect%7Bfill%3A%23ffffde%3Bstroke%3A%23aaaa33%3Bstroke-width%3A1px%3B%7D%23my-svg%20.cluster%20text%7Bfill%3A%23333%3B%7D%23my-svg%20.cluster%20span%7Bcolor%3A%23333%3B%7D%23my-svg%20div.mermaidTooltip%7Bposition%3Aabsolute%3Btext-align%3Acenter%3Bmax-width%3A200px%3Bpadding%3A2px%3Bfont-family%3A%22trebuchet%20ms%22%2Cverdana%2Carial%2Csans-serif%3Bfont-size%3A12px%3Bbackground%3Ahsl(80%2C%20100%25%2C%2096.2745098039%25)%3Bborder%3A1px%20solid%20%23aaaa33%3Bborder-radius%3A2px%3Bpointer-events%3Anone%3Bz-index%3A100%3B%7D%23my-svg%20.flowchartTitleText%7Btext-anchor%3Amiddle%3Bfont-size%3A18px%3Bfill%3A%23333%3B%7D%23my-svg%20rect.text%7Bfill%3Anone%3Bstroke-width%3A0%3B%7D%23my-svg%20.icon-shape%2C%23my-svg%20.image-shape%7Bbackground-color%3Argba(232%2C232%2C232%2C%200.8)%3Btext-align%3Acenter%3B%7D%23my-svg%20.icon-shape%20p%2C%23my-svg%20.image-shape%20p%7Bbackground-color%3Argba(232%2C232%2C232%2C%200.8)%3Bpadding%3A2px%3B%7D%23my-svg%20.icon-shape%20rect%2C%23my-svg%20.image-shape%20rect%7Bopacity%3A0.5%3Bbackground-color%3Argba(232%2C232%2C232%2C%200.8)%3Bfill%3Argba(232%2C232%2C232%2C%200.8)%3B%7D%23my-svg%20.label-icon%7Bdisplay%3Ainline-block%3Bheight%3A1em%3Boverflow%3Avisible%3Bvertical-align%3A-0.125em%3B%7D%23my-svg%20.node%20.label-icon%20path%7Bfill%3AcurrentColor%3Bstroke%3Arevert%3Bstroke-width%3Arevert%3B%7D%23my-svg%20%3Aroot%7B--mermaid-font-family%3A%22trebuchet%20ms%22%2Cverdana%2Carial%2Csans-serif%3B%7D%3C%2Fstyle%3E%3Cg%3E%3Cmarker%20id%3D%22my-svg_flowchart-v2-pointEnd%22%20class%3D%22marker%20flowchart-v2%22%20viewBox%3D%220%200%2010%2010%22%20refX%3D%225%22%20refY%3D%225%22%20markerUnits%3D%22userSpaceOnUse%22%20markerWidth%3D%228%22%20markerHeight%3D%228%22%20orient%3D%22auto%22%3E%3Cpath%20d%3D%22M%200%200%20L%2010%205%20L%200%2010%20z%22%20class%3D%22arrowMarkerPath%22%20style%3D%22stroke-width%3A%201%3B%20stroke-dasharray%3A%201%2C%200%3B%22%2F%3E%3C%2Fmarker%3E%3Cmarker%20id%3D%22my-svg_flowchart-v2-pointStart%22%20class%3D%22marker%20flowchart-v2%22%20viewBox%3D%220%200%2010%2010%22%20refX%3D%224.5%22%20refY%3D%225%22%20markerUnits%3D%22userSpaceOnUse%22%20markerWidth%3D%228%22%20markerHeight%3D%228%22%20orient%3D%22auto%22%3E%3Cpath%20d%3D%22M%200%205%20L%2010%2010%20L%2010%200%20z%22%20class%3D%22arrowMarkerPath%22%20style%3D%22stroke-width%3A%201%3B%20stroke-dasharray%3A%201%2C%200%3B%22%2F%3E%3C%2Fmarker%3E%3Cmarker%20id%3D%22my-svg_flowchart-v2-circleEnd%22%20class%3D%22marker%20flowchart-v2%22%20viewBox%3D%220%200%2010%2010%22%20refX%3D%2211%22%20refY%3D%225%22%20markerUnits%3D%22userSpaceOnUse%22%20markerWidth%3D%2211%22%20markerHeight%3D%2211%22%20orient%3D%22auto%22%3E%3Ccircle%20cx%3D%225%22%20cy%3D%225%22%20r%3D%225%22%20class%3D%22arrowMarkerPath%22%20style%3D%22stroke-width%3A%201%3B%20stroke-dasharray%3A%201%2C%200%3B%22%2F%3E%3C%2Fmarker%3E%3Cmarker%20id%3D%22my-svg_flowchart-v2-circleStart%22%20class%3D%22marker%20flowchart-v2%22%20viewBox%3D%220%200%2010%2010%22%20refX%3D%22-1%22%20refY%3D%225%22%20markerUnits%3D%22userSpaceOnUse%22%20markerWidth%3D%2211%22%20markerHeight%3D%2211%22%20orient%3D%22auto%22%3E%3Ccircle%20cx%3D%225%22%20cy%3D%225%22%20r%3D%225%22%20class%3D%22arrowMarkerPath%22%20style%3D%22stroke-width%3A%201%3B%20stroke-dasharray%3A%201%2C%200%3B%22%2F%3E%3C%2Fmarker%3E%3Cmarker%20id%3D%22my-svg_flowchart-v2-crossEnd%22%20class%3D%22marker%20cross%20flowchart-v2%22%20viewBox%3D%220%200%2011%2011%22%20refX%3D%2212%22%20refY%3D%225.2%22%20markerUnits%3D%22userSpaceOnUse%22%20markerWidth%3D%2211%22%20markerHeight%3D%2211%22%20orient%3D%22auto%22%3E%3Cpath%20d%3D%22M%201%2C1%20l%209%2C9%20M%2010%2C1%20l%20-9%2C9%22%20class%3D%22arrowMarkerPath%22%20style%3D%22stroke-width%3A%202%3B%20stroke-dasharray%3A%201%2C%200%3B%22%2F%3E%3C%2Fmarker%3E%3Cmarker%20id%3D%22my-svg_flowchart-v2-crossStart%22%20class%3D%22marker%20cross%20flowchart-v2%22%20viewBox%3D%220%200%2011%2011%22%20refX%3D%22-1%22%20refY%3D%225.2%22%20markerUnits%3D%22userSpaceOnUse%22%20markerWidth%3D%2211%22%20markerHeight%3D%2211%22%20orient%3D%22auto%22%3E%3Cpath%20d%3D%22M%201%2C1%20l%209%2C9%20M%2010%2C1%20l%20-9%2C9%22%20class%3D%22arrowMarkerPath%22%20style%3D%22stroke-width%3A%202%3B%20stroke-dasharray%3A%201%2C%200%3B%22%2F%3E%3C%2Fmarker%3E%3Cg%20class%3D%22root%22%3E%3Cg%20class%3D%22clusters%22%2F%3E%3Cg%20class%3D%22edgePaths%22%3E%3Cpath%20d%3D%22M124.695%2C62L124.695%2C66.167C124.695%2C70.333%2C124.695%2C78.667%2C124.695%2C86.333C124.695%2C94%2C124.695%2C101%2C124.695%2C104.5L124.695%2C108%22%20id%3D%22L_A_B_0%22%20class%3D%22edge-thickness-normal%20edge-pattern-solid%20edge-thickness-normal%20edge-pattern-solid%20flowchart-link%22%20style%3D%22%3B%22%20data-edge%3D%22true%22%20data-et%3D%22edge%22%20data-id%3D%22L_A_B_0%22%20data-points%3D%22W3sieCI6MTI0LjY5NTMxMjUsInkiOjYyfSx7IngiOjEyNC42OTUzMTI1LCJ5Ijo4N30seyJ4IjoxMjQuNjk1MzEyNSwieSI6MTEyfV0%3D%22%20marker-end%3D%22url(%23my-svg_flowchart-v2-pointEnd)%22%2F%3E%3Cpath%20d%3D%22M124.695%2C166L124.695%2C170.167C124.695%2C174.333%2C124.695%2C182.667%2C124.695%2C190.333C124.695%2C198%2C124.695%2C205%2C124.695%2C208.5L124.695%2C212%22%20id%3D%22L_B_C_0%22%20class%3D%22edge-thickness-normal%20edge-pattern-solid%20edge-thickness-normal%20edge-pattern-solid%20flowchart-link%22%20style%3D%22%3B%22%20data-edge%3D%22true%22%20data-et%3D%22edge%22%20data-id%3D%22L_B_C_0%22%20data-points%3D%22W3sieCI6MTI0LjY5NTMxMjUsInkiOjE2Nn0seyJ4IjoxMjQuNjk1MzEyNSwieSI6MTkxfSx7IngiOjEyNC42OTUzMTI1LCJ5IjoyMTZ9XQ%3D%3D%22%20marker-end%3D%22url(%23my-svg_flowchart-v2-pointEnd)%22%2F%3E%3Cpath%20d%3D%22M124.695%2C270L124.695%2C274.167C124.695%2C278.333%2C124.695%2C286.667%2C124.695%2C294.333C124.695%2C302%2C124.695%2C309%2C124.695%2C312.5L124.695%2C316%22%20id%3D%22L_C_D_0%22%20class%3D%22edge-thickness-normal%20edge-pattern-solid%20edge-thickness-normal%20edge-pattern-solid%20flowchart-link%22%20style%3D%22%3B%22%20data-edge%3D%22true%22%20data-et%3D%22edge%22%20data-id%3D%22L_C_D_0%22%20data-points%3D%22W3sieCI6MTI0LjY5NTMxMjUsInkiOjI3MH0seyJ4IjoxMjQuNjk1MzEyNSwieSI6Mjk1fSx7IngiOjEyNC42OTUzMTI1LCJ5IjozMjB9XQ%3D%3D%22%20marker-end%3D%22url(%23my-svg_flowchart-v2-pointEnd)%22%2F%3E%3Cpath%20d%3D%22M124.695%2C374L124.695%2C378.167C124.695%2C382.333%2C124.695%2C390.667%2C124.695%2C398.333C124.695%2C406%2C124.695%2C413%2C124.695%2C416.5L124.695%2C420%22%20id%3D%22L_D_E_0%22%20class%3D%22edge-thickness-normal%20edge-pattern-solid%20edge-thickness-normal%20edge-pattern-solid%20flowchart-link%22%20style%3D%22%3B%22%20data-edge%3D%22true%22%20data-et%3D%22edge%22%20data-id%3D%22L_D_E_0%22%20data-points%3D%22W3sieCI6MTI0LjY5NTMxMjUsInkiOjM3NH0seyJ4IjoxMjQuNjk1MzEyNSwieSI6Mzk5fSx7IngiOjEyNC42OTUzMTI1LCJ5Ijo0MjR9XQ%3D%3D%22%20marker-end%3D%22url(%23my-svg_flowchart-v2-pointEnd)%22%2F%3E%3Cpath%20d%3D%22M124.695%2C478L124.695%2C482.167C124.695%2C486.333%2C124.695%2C494.667%2C124.695%2C502.333C124.695%2C510%2C124.695%2C517%2C124.695%2C520.5L124.695%2C524%22%20id%3D%22L_E_F_0%22%20class%3D%22edge-thickness-normal%20edge-pattern-solid%20edge-thickness-normal%20edge-pattern-solid%20flowchart-link%22%20style%3D%22%3B%22%20data-edge%3D%22true%22%20data-et%3D%22edge%22%20data-id%3D%22L_E_F_0%22%20data-points%3D%22W3sieCI6MTI0LjY5NTMxMjUsInkiOjQ3OH0seyJ4IjoxMjQuNjk1MzEyNSwieSI6NTAzfSx7IngiOjEyNC42OTUzMTI1LCJ5Ijo1Mjh9XQ%3D%3D%22%20marker-end%3D%22url(%23my-svg_flowchart-v2-pointEnd)%22%2F%3E%3Cpath%20d%3D%22M124.695%2C582L124.695%2C586.167C124.695%2C590.333%2C124.695%2C598.667%2C124.695%2C606.333C124.695%2C614%2C124.695%2C621%2C124.695%2C624.5L124.695%2C628%22%20id%3D%22L_F_G_0%22%20class%3D%22edge-thickness-normal%20edge-pattern-solid%20edge-thickness-normal%20edge-pattern-solid%20flowchart-link%22%20style%3D%22%3B%22%20data-edge%3D%22true%22%20data-et%3D%22edge%22%20data-id%3D%22L_F_G_0%22%20data-points%3D%22W3sieCI6MTI0LjY5NTMxMjUsInkiOjU4Mn0seyJ4IjoxMjQuNjk1MzEyNSwieSI6NjA3fSx7IngiOjEyNC42OTUzMTI1LCJ5Ijo2MzJ9XQ%3D%3D%22%20marker-end%3D%22url(%23my-svg_flowchart-v2-pointEnd)%22%2F%3E%3Cpath%20d%3D%22M124.695%2C686L124.695%2C690.167C124.695%2C694.333%2C124.695%2C702.667%2C124.695%2C710.333C124.695%2C718%2C124.695%2C725%2C124.695%2C728.5L124.695%2C732%22%20id%3D%22L_G_H_0%22%20class%3D%22edge-thickness-normal%20edge-pattern-solid%20edge-thickness-normal%20edge-pattern-solid%20flowchart-link%22%20style%3D%22%3B%22%20data-edge%3D%22true%22%20data-et%3D%22edge%22%20data-id%3D%22L_G_H_0%22%20data-points%3D%22W3sieCI6MTI0LjY5NTMxMjUsInkiOjY4Nn0seyJ4IjoxMjQuNjk1MzEyNSwieSI6NzExfSx7IngiOjEyNC42OTUzMTI1LCJ5Ijo3MzZ9XQ%3D%3D%22%20marker-end%3D%22url(%23my-svg_flowchart-v2-pointEnd)%22%2F%3E%3C%2Fg%3E%3Cg%20class%3D%22edgeLabels%22%3E%3Cg%20class%3D%22edgeLabel%22%3E%3Cg%20class%3D%22label%22%20data-id%3D%22L_A_B_0%22%20transform%3D%22translate(0%2C%200)%22%3E%3CforeignObject%20width%3D%220%22%20height%3D%220%22%3E%3Cdiv%20xmlns%3D%22http%3A%2F%2Fwww.w3.org%2F1999%2Fxhtml%22%20class%3D%22labelBkg%22%20style%3D%22display%3A%20table-cell%3B%20white-space%3A%20nowrap%3B%20line-height%3A%201.5%3B%20max-width%3A%20200px%3B%20text-align%3A%20center%3B%22%3E%3Cspan%20class%3D%22edgeLabel%22%3E%3C%2Fspan%3E%3C%2Fdiv%3E%3C%2FforeignObject%3E%3C%2Fg%3E%3C%2Fg%3E%3Cg%20class%3D%22edgeLabel%22%3E%3Cg%20class%3D%22label%22%20data-id%3D%22L_B_C_0%22%20transform%3D%22translate(0%2C%200)%22%3E%3CforeignObject%20width%3D%220%22%20height%3D%220%22%3E%3Cdiv%20xmlns%3D%22http%3A%2F%2Fwww.w3.org%2F1999%2Fxhtml%22%20class%3D%22labelBkg%22%20style%3D%22display%3A%20table-cell%3B%20white-space%3A%20nowrap%3B%20line-height%3A%201.5%3B%20max-width%3A%20200px%3B%20text-align%3A%20center%3B%22%3E%3Cspan%20class%3D%22edgeLabel%22%3E%3C%2Fspan%3E%3C%2Fdiv%3E%3C%2FforeignObject%3E%3C%2Fg%3E%3C%2Fg%3E%3Cg%20class%3D%22edgeLabel%22%3E%3Cg%20class%3D%22label%22%20data-id%3D%22L_C_D_0%22%20transform%3D%22translate(0%2C%200)%22%3E%3CforeignObject%20width%3D%220%22%20height%3D%220%22%3E%3Cdiv%20xmlns%3D%22http%3A%2F%2Fwww.w3.org%2F1999%2Fxhtml%22%20class%3D%22labelBkg%22%20style%3D%22display%3A%20table-cell%3B%20white-space%3A%20nowrap%3B%20line-height%3A%201.5%3B%20max-width%3A%20200px%3B%20text-align%3A%20center%3B%22%3E%3Cspan%20class%3D%22edgeLabel%22%3E%3C%2Fspan%3E%3C%2Fdiv%3E%3C%2FforeignObject%3E%3C%2Fg%3E%3C%2Fg%3E%3Cg%20class%3D%22edgeLabel%22%3E%3Cg%20class%3D%22label%22%20data-id%3D%22L_D_E_0%22%20transform%3D%22translate(0%2C%200)%22%3E%3CforeignObject%20width%3D%220%22%20height%3D%220%22%3E%3Cdiv%20xmlns%3D%22http%3A%2F%2Fwww.w3.org%2F1999%2Fxhtml%22%20class%3D%22labelBkg%22%20style%3D%22display%3A%20table-cell%3B%20white-space%3A%20nowrap%3B%20line-height%3A%201.5%3B%20max-width%3A%20200px%3B%20text-align%3A%20center%3B%22%3E%3Cspan%20class%3D%22edgeLabel%22%3E%3C%2Fspan%3E%3C%2Fdiv%3E%3C%2FforeignObject%3E%3C%2Fg%3E%3C%2Fg%3E%3Cg%20class%3D%22edgeLabel%22%3E%3Cg%20class%3D%22label%22%20data-id%3D%22L_E_F_0%22%20transform%3D%22translate(0%2C%200)%22%3E%3CforeignObject%20width%3D%220%22%20height%3D%220%22%3E%3Cdiv%20xmlns%3D%22http%3A%2F%2Fwww.w3.org%2F1999%2Fxhtml%22%20class%3D%22labelBkg%22%20style%3D%22display%3A%20table-cell%3B%20white-space%3A%20nowrap%3B%20line-height%3A%201.5%3B%20max-width%3A%20200px%3B%20text-align%3A%20center%3B%22%3E%3Cspan%20class%3D%22edgeLabel%22%3E%3C%2Fspan%3E%3C%2Fdiv%3E%3C%2FforeignObject%3E%3C%2Fg%3E%3C%2Fg%3E%3Cg%20class%3D%22edgeLabel%22%3E%3Cg%20class%3D%22label%22%20data-id%3D%22L_F_G_0%22%20transform%3D%22translate(0%2C%200)%22%3E%3CforeignObject%20width%3D%220%22%20height%3D%220%22%3E%3Cdiv%20xmlns%3D%22http%3A%2F%2Fwww.w3.org%2F1999%2Fxhtml%22%20class%3D%22labelBkg%22%20style%3D%22display%3A%20table-cell%3B%20white-space%3A%20nowrap%3B%20line-height%3A%201.5%3B%20max-width%3A%20200px%3B%20text-align%3A%20center%3B%22%3E%3Cspan%20class%3D%22edgeLabel%22%3E%3C%2Fspan%3E%3C%2Fdiv%3E%3C%2FforeignObject%3E%3C%2Fg%3E%3C%2Fg%3E%3Cg%20class%3D%22edgeLabel%22%3E%3Cg%20class%3D%22label%22%20data-id%3D%22L_G_H_0%22%20transform%3D%22translate(0%2C%200)%22%3E%3CforeignObject%20width%3D%220%22%20height%3D%220%22%3E%3Cdiv%20xmlns%3D%22http%3A%2F%2Fwww.w3.org%2F1999%2Fxhtml%22%20class%3D%22labelBkg%22%20style%3D%22display%3A%20table-cell%3B%20white-space%3A%20nowrap%3B%20line-height%3A%201.5%3B%20max-width%3A%20200px%3B%20text-align%3A%20center%3B%22%3E%3Cspan%20class%3D%22edgeLabel%22%3E%3C%2Fspan%3E%3C%2Fdiv%3E%3C%2FforeignObject%3E%3C%2Fg%3E%3C%2Fg%3E%3C%2Fg%3E%3Cg%20class%3D%22nodes%22%3E%3Cg%20class%3D%22node%20default%22%20id%3D%22flowchart-A-0%22%20transform%3D%22translate(124.6953125%2C%2035)%22%3E%3Crect%20class%3D%22basic%20label-container%22%20style%3D%22%22%20x%3D%22-64.6796875%22%20y%3D%22-27%22%20width%3D%22129.359375%22%20height%3D%2254%22%2F%3E%3Cg%20class%3D%22label%22%20style%3D%22%22%20transform%3D%22translate(-34.6796875%2C%20-12)%22%3E%3Crect%2F%3E%3CforeignObject%20width%3D%2269.359375%22%20height%3D%2224%22%3E%3Cdiv%20xmlns%3D%22http%3A%2F%2Fwww.w3.org%2F1999%2Fxhtml%22%20style%3D%22display%3A%20table-cell%3B%20white-space%3A%20nowrap%3B%20line-height%3A%201.5%3B%20max-width%3A%20200px%3B%20text-align%3A%20center%3B%22%3E%3Cspan%20class%3D%22nodeLabel%22%3E%3Cp%3ECustomer%3C%2Fp%3E%3C%2Fspan%3E%3C%2Fdiv%3E%3C%2FforeignObject%3E%3C%2Fg%3E%3C%2Fg%3E%3Cg%20class%3D%22node%20default%22%20id%3D%22flowchart-B-1%22%20transform%3D%22translate(124.6953125%2C%20139)%22%3E%3Crect%20class%3D%22basic%20label-container%22%20style%3D%22%22%20x%3D%22-83.78125%22%20y%3D%22-27%22%20width%3D%22167.5625%22%20height%3D%2254%22%2F%3E%3Cg%20class%3D%22label%22%20style%3D%22%22%20transform%3D%22translate(-53.78125%2C%20-12)%22%3E%3Crect%2F%3E%3CforeignObject%20width%3D%22107.5625%22%20height%3D%2224%22%3E%3Cdiv%20xmlns%3D%22http%3A%2F%2Fwww.w3.org%2F1999%2Fxhtml%22%20style%3D%22display%3A%20table-cell%3B%20white-space%3A%20nowrap%3B%20line-height%3A%201.5%3B%20max-width%3A%20200px%3B%20text-align%3A%20center%3B%22%3E%3Cspan%20class%3D%22nodeLabel%22%3E%3Cp%3EWHMCS%20Order%3C%2Fp%3E%3C%2Fspan%3E%3C%2Fdiv%3E%3C%2FforeignObject%3E%3C%2Fg%3E%3C%2Fg%3E%3Cg%20class%3D%22node%20default%22%20id%3D%22flowchart-C-3%22%20transform%3D%22translate(124.6953125%2C%20243)%22%3E%3Crect%20class%3D%22basic%20label-container%22%20style%3D%22%22%20x%3D%22-95.375%22%20y%3D%22-27%22%20width%3D%22190.75%22%20height%3D%2254%22%2F%3E%3Cg%20class%3D%22label%22%20style%3D%22%22%20transform%3D%22translate(-65.375%2C%20-12)%22%3E%3Crect%2F%3E%3CforeignObject%20width%3D%22130.75%22%20height%3D%2224%22%3E%3Cdiv%20xmlns%3D%22http%3A%2F%2Fwww.w3.org%2F1999%2Fxhtml%22%20style%3D%22display%3A%20table-cell%3B%20white-space%3A%20nowrap%3B%20line-height%3A%201.5%3B%20max-width%3A%20200px%3B%20text-align%3A%20center%3B%22%3E%3Cspan%20class%3D%22nodeLabel%22%3E%3Cp%3EInvoice%20Generated%3C%2Fp%3E%3C%2Fspan%3E%3C%2Fdiv%3E%3C%2FforeignObject%3E%3C%2Fg%3E%3C%2Fg%3E%3Cg%20class%3D%22node%20default%22%20id%3D%22flowchart-D-5%22%20transform%3D%22translate(124.6953125%2C%20347)%22%3E%3Crect%20class%3D%22basic%20label-container%22%20style%3D%22%22%20x%3D%22-113.5859375%22%20y%3D%22-27%22%20width%3D%22227.171875%22%20height%3D%2254%22%2F%3E%3Cg%20class%3D%22label%22%20style%3D%22%22%20transform%3D%22translate(-83.5859375%2C%20-12)%22%3E%3Crect%2F%3E%3CforeignObject%20width%3D%22167.171875%22%20height%3D%2224%22%3E%3Cdiv%20xmlns%3D%22http%3A%2F%2Fwww.w3.org%2F1999%2Fxhtml%22%20style%3D%22display%3A%20table-cell%3B%20white-space%3A%20nowrap%3B%20line-height%3A%201.5%3B%20max-width%3A%20200px%3B%20text-align%3A%20center%3B%22%3E%3Cspan%20class%3D%22nodeLabel%22%3E%3Cp%3EiPaymu%20Direct%20Payment%3C%2Fp%3E%3C%2Fspan%3E%3C%2Fdiv%3E%3C%2FforeignObject%3E%3C%2Fg%3E%3C%2Fg%3E%3Cg%20class%3D%22node%20default%22%20id%3D%22flowchart-E-7%22%20transform%3D%22translate(124.6953125%2C%20451)%22%3E%3Crect%20class%3D%22basic%20label-container%22%20style%3D%22%22%20x%3D%22-98.46875%22%20y%3D%22-27%22%20width%3D%22196.9375%22%20height%3D%2254%22%2F%3E%3Cg%20class%3D%22label%22%20style%3D%22%22%20transform%3D%22translate(-68.46875%2C%20-12)%22%3E%3Crect%2F%3E%3CforeignObject%20width%3D%22136.9375%22%20height%3D%2224%22%3E%3Cdiv%20xmlns%3D%22http%3A%2F%2Fwww.w3.org%2F1999%2Fxhtml%22%20style%3D%22display%3A%20table-cell%3B%20white-space%3A%20nowrap%3B%20line-height%3A%201.5%3B%20max-width%3A%20200px%3B%20text-align%3A%20center%3B%22%3E%3Cspan%20class%3D%22nodeLabel%22%3E%3Cp%3ECustomer%20Payment%3C%2Fp%3E%3C%2Fspan%3E%3C%2Fdiv%3E%3C%2FforeignObject%3E%3C%2Fg%3E%3C%2Fg%3E%3Cg%20class%3D%22node%20default%22%20id%3D%22flowchart-F-9%22%20transform%3D%22translate(124.6953125%2C%20555)%22%3E%3Crect%20class%3D%22basic%20label-container%22%20style%3D%22%22%20x%3D%22-89.578125%22%20y%3D%22-27%22%20width%3D%22179.15625%22%20height%3D%2254%22%2F%3E%3Cg%20class%3D%22label%22%20style%3D%22%22%20transform%3D%22translate(-59.578125%2C%20-12)%22%3E%3Crect%2F%3E%3CforeignObject%20width%3D%22119.15625%22%20height%3D%2224%22%3E%3Cdiv%20xmlns%3D%22http%3A%2F%2Fwww.w3.org%2F1999%2Fxhtml%22%20style%3D%22display%3A%20table-cell%3B%20white-space%3A%20nowrap%3B%20line-height%3A%201.5%3B%20max-width%3A%20200px%3B%20text-align%3A%20center%3B%22%3E%3Cspan%20class%3D%22nodeLabel%22%3E%3Cp%3EiPaymu%20Callback%3C%2Fp%3E%3C%2Fspan%3E%3C%2Fdiv%3E%3C%2FforeignObject%3E%3C%2Fg%3E%3C%2Fg%3E%3Cg%20class%3D%22node%20default%22%20id%3D%22flowchart-G-11%22%20transform%3D%22translate(124.6953125%2C%20659)%22%3E%3Crect%20class%3D%22basic%20label-container%22%20style%3D%22%22%20x%3D%22-116.6953125%22%20y%3D%22-27%22%20width%3D%22233.390625%22%20height%3D%2254%22%2F%3E%3Cg%20class%3D%22label%22%20style%3D%22%22%20transform%3D%22translate(-86.6953125%2C%20-12)%22%3E%3Crect%2F%3E%3CforeignObject%20width%3D%22173.390625%22%20height%3D%2224%22%3E%3Cdiv%20xmlns%3D%22http%3A%2F%2Fwww.w3.org%2F1999%2Fxhtml%22%20style%3D%22display%3A%20table-cell%3B%20white-space%3A%20nowrap%3B%20line-height%3A%201.5%3B%20max-width%3A%20200px%3B%20text-align%3A%20center%3B%22%3E%3Cspan%20class%3D%22nodeLabel%22%3E%3Cp%3EWHMCS%20Update%20Invoice%3C%2Fp%3E%3C%2Fspan%3E%3C%2Fdiv%3E%3C%2FforeignObject%3E%3C%2Fg%3E%3C%2Fg%3E%3Cg%20class%3D%22node%20default%22%20id%3D%22flowchart-H-13%22%20transform%3D%22translate(124.6953125%2C%20763)%22%3E%3Crect%20class%3D%22basic%20label-container%22%20style%3D%22%22%20x%3D%22-75.6484375%22%20y%3D%22-27%22%20width%3D%22151.296875%22%20height%3D%2254%22%2F%3E%3Cg%20class%3D%22label%22%20style%3D%22%22%20transform%3D%22translate(-45.6484375%2C%20-12)%22%3E%3Crect%2F%3E%3CforeignObject%20width%3D%2291.296875%22%20height%3D%2224%22%3E%3Cdiv%20xmlns%3D%22http%3A%2F%2Fwww.w3.org%2F1999%2Fxhtml%22%20style%3D%22display%3A%20table-cell%3B%20white-space%3A%20nowrap%3B%20line-height%3A%201.5%3B%20max-width%3A%20200px%3B%20text-align%3A%20center%3B%22%3E%3Cspan%20class%3D%22nodeLabel%22%3E%3Cp%3EInvoice%20PAID%3C%2Fp%3E%3C%2Fspan%3E%3C%2Fdiv%3E%3C%2FforeignObject%3E%3C%2Fg%3E%3C%2Fg%3E%3C%2Fg%3E%3C%2Fg%3E%3C%2Fg%3E%3C%2Fsvg%3E)